Difference between revisions of "OS Mission"
Hypermage2 (talk | contribs) |
Hypermage2 (talk | contribs) (→Rewards:: Added rewards, added mention of osad cube) |
||
| Line 20: | Line 20: | ||
[[File:Shown Map.png|none|frame|Shown Map]] | [[File:Shown Map.png|none|frame|Shown Map]] | ||
[[File:Actual Map.png|none|frame|Actual Map]] | [[File:Actual Map.png|none|frame|Actual Map]] | ||
| − | |||
=== Rewards: === | === Rewards: === | ||
The following items are given as a reward for defeating the boss and from finishing the instance: | The following items are given as a reward for defeating the boss and from finishing the instance: | ||
| − | |||
* {{Item List |id=25723|item=Cor Core}} | * {{Item List |id=25723|item=Cor Core}} | ||
* {{Item List |id=25669|item=Unknown Parts}} | * {{Item List |id=25669|item=Unknown Parts}} | ||
* {{Item List |id=25668|item=Broken Weapon}} | * {{Item List |id=25668|item=Broken Weapon}} | ||
| + | These items can be traded for various [https://wiki.shining-moon.com/index.php/OS_Mission#Illusion_OS_Equipment equipment] via npc in [[Fortessa#Instance Area .28.40go exchanger.29| @go exchange]] | ||
| − | + | Additionally, {{Item List |id=101355|item=OS Remodel Cube}}can be obtained at random from doing the instance in hell mode or higher. The item is used to convert any of the OS weapons and their headgears into their OSAD counterpart. | |
| − | |||
=Enemies= | =Enemies= | ||
{| class="wikitable" style="text-align: center; | {| class="wikitable" style="text-align: center; | ||
| Line 566: | Line 564: | ||
*Has a 1% chance to recovery 80 SP per 0.5 second for 10 seconds when dealing magical damage | *Has a 1% chance to recovery 80 SP per 0.5 second for 10 seconds when dealing magical damage | ||
|} | |} | ||
| − | |||
=== Illusion OS Weapons === | === Illusion OS Weapons === | ||
{| class="mw-collapsible wikitable" style="text-align: center; margin:auto; width: 90%" | {| class="mw-collapsible wikitable" style="text-align: center; margin:auto; width: 90%" | ||
Revision as of 14:32, 10 May 2022
| Requirements | |
|---|---|
| Base Level: | 110 |
| Starting Point: | Instance Manager in any town
|
| Rewards | |
| Experience: | - |
| Cooldown | |
| Cooldown: | Resets at 00:01 Servertime |
Walkthrough
The objective is to clear waves of mobs to progress in the instance. The waves get progressively stronger, starting at CP 1 and ending in CP 6. At the end of the instance, you will have to fight Miguel who will be assigned a random CP, and has access to the following skills:
- Heal - When idle. Targets self. Heals for 9,999
- High Heal - When idle. Targets self. Long cast time.
- Bomb - When attacking and chasing.
- Earthquake - When attacking (CP5 4k per hit, CP7 about 10k damage per hit, CP20 about 40k damage per hit, CP22 43k per hit)
- Magnum Break - When attacking
- Ignition Break - When attacking
Miguel will also spawn fireballs around him that damage players that get too close to it. As the fight progresses, he will summon more fireballs around him.
Note: Despite the map showing a large area, the instance is actually confined to a small area of the map.


Rewards:
The following items are given as a reward for defeating the boss and from finishing the instance:
These items can be traded for various equipment via npc in @go exchange
Additionally, ![]() OS Remodel Cube can be obtained at random from doing the instance in hell mode or higher. The item is used to convert any of the OS weapons and their headgears into their OSAD counterpart.
OS Remodel Cube can be obtained at random from doing the instance in hell mode or higher. The item is used to convert any of the OS weapons and their headgears into their OSAD counterpart.
Enemies
| Image | Name | Level | HP | Size/Race/Element |
|---|---|---|---|---|

|
Incomplete Caput | 110 | 31,000 | Medium/Demi-Human/Dark 2 |

|
Incomplete Dolor | 111 | 31,000 | /Demi-Human/Poison 3 |

|
Incomplete Bellare | 112 | 38,000 | /Demi-Human/Neutral 2 |

|
Miguel | 115 | 8,600,000 | /Demi-Human/Wind 4 |
Illusion OS Equipment
Illusion Armors
| Image | Name | Effect | How to Obtain |
|---|---|---|---|

|
Illusion Armor B-type [1] | ATK + 100. ATK + 10 per 2 refine rate. If refine rate is 7 or higher: Reduces variable casting time by 10%. [+ [+ |
@go exchanger NPC: Illusion OS Cost: 50x |
.png)
|
Illusion Armor B-type [1] | MATK + 100. MATK + 10 per 2 refine rate. If refine rate is 7 or higher: Reduces variable casting time by 10%. [+ [+ |
@go exchanger NPC: Illusion OS Cost: 50x |
.png)
|
Illusion Engine Wing A-type [1] | MaxHP + 1000. MaxHP + 100 per 2 refine rate. If refine rate is 7 or higher: Increases attack speed (reduces delay after attack by 5%). [+ [+ |
@go exchanger NPC: Illusion OS Cost: 50x |
.png)
|
Illusion Engine Wing B-type [1] | MaxHP + 1000. MaxHP + 100 per 2 refine rate. If refine rate is 7 or higher: Reduces variable casting time by 5%. [+ [+ |
@go exchanger NPC: Illusion OS Cost: 50x |
.png)
|
Illusion Leg A-type [1] | MaxSP + 200 MaxSP + 20 per 2 refine rate. If refine rate is 7 or higher: Increases long ranged physical damage by 5%. [+ [+ |
@go exchanger NPC: Illusion OS Cost: 50x |
.png)
|
Illusion Leg B-type [1] | MaxSP + 200 MaxSP + 20 per 2 refine rate. If refine rate is 7 or higher: Increases all properties magical damage by 5%. [+ [+ |
@go exchanger NPC: Illusion OS Cost: 50x |
.png)
|
Illusion Booster R [1] | ATK + 5%.
|
@go exchanger NPC: Illusion OS Cost: 50x |
.png)
|
Illusion Booster L [1] | ATK + 5%.
|
@go exchanger NPC: Illusion OS Cost: 50x |
.png)
|
Illusion Battle chip R [1] | MATK + 5%.
|
@go exchanger NPC: Illusion OS Cost: 50x |
.png)
|
Illusion Battle chip L [1] | MATK + 5%.
|
@go exchanger NPC: Illusion OS Cost: 50x |
Illusion OS Modification Modules
Modification Modules can be crafted for ![]() Cor Core x5 and
Cor Core x5 and ![]() Unknown Parts x30 at the Illusion OS NPC in Fortessa 84/112 You can use @go exchanger to get to the NPC
Unknown Parts x30 at the Illusion OS NPC in Fortessa 84/112 You can use @go exchanger to get to the NPC
There are four different types of module ![]() Normal ,
Normal , ![]() Rare ,
Rare , ![]() Unique , and
Unique , and ![]() Legendary . Normal has the highest chance of success to craft and Legendary has the lowest.
Legendary . Normal has the highest chance of success to craft and Legendary has the lowest.
Illusion Equipment can be modified with a number of different module types. Each piece of equipment can have a maximum of 3 modules. Though certain modules have a restriction on the number of times it can be place on the equipment.
| Armor | ||
|---|---|---|
| Module | Effect | |
Up to 3 modules can be placed on equipment |
| |
Up to 3 modules can be placed on equipment |
| |
Up to 2 modules can be placed on equipment |
| |
Up to 2 modules can be placed on equipment |
| |
Up to 2 modules can be placed on equipment |
| |
Up to 1 modules can be placed on equipment |
| |
| Engine Wing | ||
|---|---|---|
| Module | Effect | |
Up to 3 modules can be placed on equipment |
| |
Up to 3 modules can be placed on equipment |
| |
Up to 2 modules can be placed on equipment |
| |
Up to 2 modules can be placed on equipment |
| |
Up to 2 modules can be placed on equipment |
| |
Up to 1 modules can be placed on equipment |
| |
| Leg | ||
|---|---|---|
| Module | Effect | |
Up to 3 modules can be placed on equipment |
| |
Up to 3 modules can be placed on equipment |
| |
Up to 2 modules can be placed on equipment |
| |
Up to 2 modules can be placed on equipment |
| |
Up to 2 modules can be placed on equipment |
| |
Up to 1 modules can be placed on equipment |
| |
Only 1 Legendary module per equipment |
| |
Only 1 Legendary module per equipment |
| |
Only 1 Legendary module per equipment |
| |
Only 1 Legendary module per equipment |
| |
Only 1 Legendary module per equipment |
| |
Only 1 Legendary module per equipment |
| |
| Booster R & Battle Chip R | ||
|---|---|---|
| Module | Effect | |
Up to 3 modules can be placed on equipment |
| |
Up to 3 modules can be placed on equipment |
| |
Up to 3 modules can be placed on equipment |
| |
Up to3 modules can be placed on equipment |
| |
Up to 2 modules can be placed on equipment |
| |
Up to 1 modules can be placed on equipment |
| |
Up to 1 modules can be placed on equipment |
| |
Up to 1 modules can be placed on equipment |
| |
Up to 1 modules can be placed on equipment |
| |
Up to 1 modules can be placed on equipment |
| |
Up to 1 modules can be placed on equipment |
| |
| Booster L & Battle Chip L | ||
|---|---|---|
| Module | Effect | |
Up to 3 modules can be placed on equipment |
| |
Up to 3 modules can be placed on equipment |
| |
Up to 3 modules can be placed on equipment |
| |
Up to 3 modules can be placed on equipment |
| |
Up to 2 modules can be placed on equipment |
| |
Up to 1 modules can be placed on equipment |
| |
Up to 1 modules can be placed on equipment |
| |
Up to 1 modules can be placed on equipment |
| |
Up to 1 modules can be placed on equipment |
| |
Up to 1 modules can be placed on equipment |
| |
Up to 1 modules can be placed on equipment |
| |
Illusion OS Weapons
| Image | Name | Effect | How to obtain |
|---|---|---|---|

|
Burning Knuckle-OS [2] | ATK + 3%.
If refine rate is 7 or higher: If refine rate is 9 or higher: If refine rate is 11 or higher: |
@go exchanger NPC: Illusion OS Cost: 1x |
|
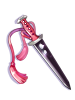
Cannon Rapier-OS [2] | MATK + 150. When dealing melee physical damage, has a chance to auto cast Fireball, level of Fireball is equal to level of refine rate (up to level 10). If refine rate is 7 or higher: If refine rate is 9 or higher: If refine rate is 11 or higher: |
@go exchanger NPC: Illusion OS Cost: 1x |

|
Saphir Mace-OS [2] | Can't be destroyed. ATK + 3%. If refine rate is 7 or higher: If refine rate is 9 or higher: If refine rate is 11 or higher: |
@go exchanger NPC: Illusion OS Cost: 1x |

|
Ultio-OS [2] | MATK + 170. MATK + 3%. If refine rate is 7 or higher: If refine rate is 9 or higher: If refine rate is 11 or higher: |
@go exchanger NPC: Illusion OS Cost: 1x |

|
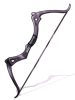
Virtual Bow-OS [2] | ATK + 3%.
If refine rate is 7 or higher: If refine rate is 9 or higher: If refine rate is 11 or higher: |
@go exchanger NPC: Illusion OS Cost: 1x |

|
MH-P89-OS [2] | ATK + 3%.
If refine rate is 7 or higher: If refine rate is 9 or higher: If refine rate is 11 or higher: |
@go exchanger NPC: Illusion OS Cost: 1x |
|
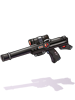
AC-B44-OS [2] | MATK + 135. Increase bow damage by 5%. If refine rate is 7 or higher: If refine rate is 9 or higher: If refine rate is 11 or higher: |
@go exchanger NPC: Illusion OS Cost: 1x |

|
Beam Claymor-OS [2] | Can't be destroyed. Cri + 5. If refine rate is 7 or higher: If refine rate is 9 or higher: If refine rate is 11 or higher: |
@go exchanger NPC: Illusion OS Cost: 1x |

|
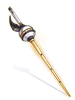
Rutilus Stick-OS [2] | Can't be destroyed. MATK + 175. If refine rate is 7 or higher: If refine rate is 9 or higher: If refine rate is 11 or higher: |
@go exchanger NPC: Illusion OS Cost: 1x |

|
Meuchler-OS [2] | ATK + 3%.
If refine rate is 7 or higher: If refine rate is 9 or higher: If refine rate is 11 or higher:
|
@go exchanger NPC: Illusion OS Cost: 1x |

|
Blasti-OS [2] | Can't be destroyed. Reduces damage taken from medium and large enemies by 10%. If refine rate is 7 or higher: If refine rate is 9 or higher: If refine rate is 11 or higher: |
@go exchanger NPC: Illusion OS Cost: 1x |
|
HR-55-OS [2] | ATK + 3%.
If refine rate is 7 or higher: If refine rate is 9 or higher: If refine rate is 11 or higher:
|
@go exchanger NPC: Illusion OS Cost: 1x |

|
Circuit Board-OS [2] | ATK + 3%.
If refine rate is 7 or higher: If refine rate is 9 or higher: If refine rate is 11 or higher: |
@go exchanger NPC: Illusion OS Cost: 1x |
|
Kuroiro-OS [2] | MATK + 150. Increases physical and magical damage against shadow and undead property enemies by 5%. If refine rate is 7 or higher: If refine rate is 9 or higher: If refine rate is 11 or higher: |
@go exchanger NPC: Illusion OS Cost: 1x |

|
Boost Lance-OS [2] | Increases attack speed (reduces delay after attack by 3%).
If refine rate is 7 or higher: If refine rate is 9 or higher: If refine rate is 11 or higher:
|
@go exchanger NPC: Illusion OS Cost: 1x |

|
Electric Fox-OS [2] | MATK + 350 MATK + 5%. If refine rate is 7 or higher: If refine rate is 9 or higher: If refine rate is 11 or higher: |
@go exchanger NPC: Illusion OS Cost: 1x |
Illusion OS Weapon Enchants
There are a total of 6 different Enchanting Items, list can be found here.